Wednesday, May 24, 2017

A Summer Chicken Coop

Purchased this make shift bar from the thrift store. Stood it on a pallett


The shelves came out pretty easily


a summer chicken coop, diy, doors, homesteading, outdoor living, repurposing upcycling, woodworking projects


Had an old door in the barn. Used it to cut a bottom for the coop


a summer chicken coop, diy, doors, homesteading, outdoor living, repurposing upcycling, woodworking projects


put some left over metal roofing on top


a summer chicken coop, diy, doors, homesteading, outdoor living, repurposing upcycling, woodworking projects


Mounted a bucked on the back wall for a nesting box (wound up removing that later as it was not working out. I included it because you can see it in the photos)


a summer chicken coop, diy, doors, homesteading, outdoor living, repurposing upcycling, woodworking projects


out of boards sandwiched in metal hardwire and made a door


a summer chicken coop, diy, doors, homesteading, outdoor living, repurposing upcycling, woodworking projects


added a perch made out of EMT pipe


a summer chicken coop, diy, doors, homesteading, outdoor living, repurposing upcycling, woodworking projects


Painted the roof blue


a summer chicken coop, diy, doors, homesteading, outdoor living, repurposing upcycling, woodworking projects


and added the chickens


a summer chicken coop, diy, doors, homesteading, outdoor living, repurposing upcycling, woodworking projects


a summer chicken coop, diy, doors, homesteading, outdoor living, repurposing upcycling, woodworking projects


They seem to like it. I am going to put some bantams in there this year


a summer chicken coop, diy, doors, homesteading, outdoor living, repurposing upcycling, woodworking projects


Original article and pictures take http://www.hometalk.com/14094969/a-summer-chicken-coop site

Jewelry Dishes

Purchased some square white plates from the thrift store


and some little knick knacks. They all were damaged in some way


jewelry dishes, crafts, repurposing upcycling


jewelry dishes, crafts, repurposing upcycling


jewelry dishes, crafts, repurposing upcycling


I wanted to color them with gold metallic paint


jewelry dishes, crafts, repurposing upcycling


and I wanted to get a design on the plate so I took a piece of lace and sprayed it with spray adhesive and smoothed it to the plate


jewelry dishes, crafts, repurposing upcycling


then spray painted them and lifted the lace off. all of them had different designs


jewelry dishes, crafts, repurposing upcycling


jewelry dishes, crafts, repurposing upcycling


jewelry dishes, crafts, repurposing upcycling


I turned the plates over and sprayed the backs and all the animals. I had to spray the animals so you would not notice the damages to them


jewelry dishes, crafts, repurposing upcycling


I stuck on some weather stripping to the bottom to cushion it and make sure it does not scratch furniture.


jewelry dishes, crafts, repurposing upcycling


I gave them to my daughter and daughter inlaws to keep in their kitchen or by the bed to put their rings in when they take them off.


jewelry dishes, crafts, repurposing upcycling


jewelry dishes, crafts, repurposing upcycling


jewelry dishes, crafts, repurposing upcycling


jewelry dishes, crafts, repurposing upcycling


Original article and pictures take http://www.hometalk.com/14095330/jewelry-dishes site

So the Kids Wanted a Garden....

Even though we have a huge yard, having a garden has always been difficult. With our 4-6 very large Rhodesian Ridgebacks, it was rare that I could ever pick anything grown before they helped themselves. The year that our Foundation boy decided to make a bed out of all of my tomato plants put an end to my spending the money on trying to garden.


The Front yard has sun issues as it is covered by massive old oaks. Growing a lawn was a lost cause so we settled for some decorative shrubs. It dawned on me the other day that if we built a vertical garden and made it mobile, we could chase both sun and bees !


so the kids wanted a garden, container gardening, diy, gardening, woodworking projects


I have very few skills when it comes to carpentry. Plus I wanted the kids to do a LOT with a Little. Together we went to Lowes where we purchased 2 2"X6"X8' and 4 2"X4"X8', I had Joey cut all of the boards in half. Adding some chicken wire, hinges, nails, cardboard, paper, and potting soil and we were ready to begin. Since we'd had the wood cut, and we would not be using wood screws, ( SOMEONE forgot where he put the drill....) all we need was a staple gun, hammer and wire cutters.


so the kids wanted a garden, container gardening, diy, gardening, woodworking projects


Ceattle stapled the wire to what would be the inside of the 2"X4"X4' s, making sure to leave room at the ends for them to be attached to the uprights.


so the kids wanted a garden, container gardening, diy, gardening, woodworking projects


Simple hinges, we used 3. I did not insist on using 6 nails per, as long as we have 4 the pull and weight are evenly distributed.


so the kids wanted a garden, container gardening, diy, gardening, woodworking projects


Tris and I connected 2 of the 2"X6"X4' uprights with the hinges. Then he began assembling the frame and beds.


so the kids wanted a garden, container gardening, diy, gardening, woodworking projects


We used a wire bottom to lighten the weight of the unit, and to avoid both wood rot and likely killing the plants with overly soaked soil. Once together, we used a long strip of cardboard, then some end roll paper that we get from the local newspaper. This is all it takes to keep from the soil falling out. And as my Granddaughter pointed out, it's all biodegradable!


so the kids wanted a garden, container gardening, diy, gardening, woodworking projects


Because of the hinges the garden takes on an L shape. This allows it to stand alone and be adjusted when needed. When we are done with it for the year, we can fold it closed making it only 12" deep.


so the kids wanted a garden, container gardening, diy, gardening, woodworking projects


Bedding plants were added making sure that flowers were scattered between veggies and herbs to help attract bees for pollination. The top level became our Grape Tomato and herb beds. I think I can add a cage of sorts if the plants really need it, but they are already taller than anything else we intended to plant.


so the kids wanted a garden, container gardening, diy, gardening, woodworking projects


The bottom level had a wavy wire added for the snap peas and green beans to climb.


so the kids wanted a garden, container gardening, diy, gardening, woodworking projects


If this works out we will build more next year, maybe even later this year. Even if the garden bears zero fruit the kids and I had a great time, we all enjoyed an afternoon in the sunshine!


so the kids wanted a garden, container gardening, diy, gardening, woodworking projects


Original article and pictures take http://www.hometalk.com/14096256/so-the-kids-wanted-a-garden site

From Playful Kid's bathroom to Sophisticated adult teen bathroom ON A BUDGET! Not everyone has thousands to spend !!


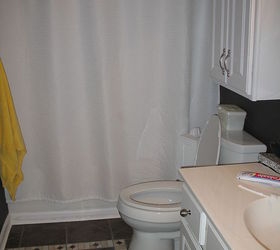
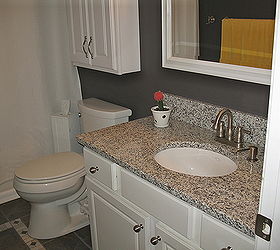
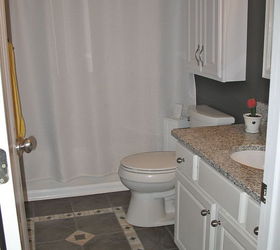
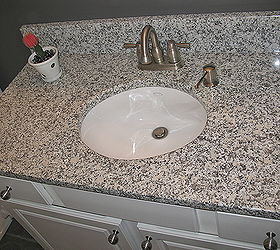
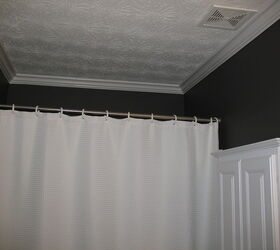
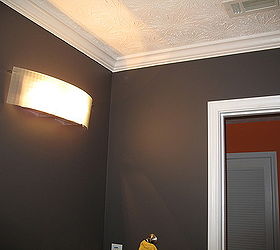
Everything you see in this bathroom is NEW, including the toilet! And YES, I did all the work myself, from wiring the new light fixture to, putting up the new mirror, the new crown molding, the tile floor, the granite bathroom counter top I had cut at a granite place choosing a remnant piece that ended up being cheaper. I also installed the toilet, new faucet, bathtub spout & shower head for the bathroom. My son picked the color on the walls!
I believe YOU can do it! DIY is my motto, and living in you home the way YOU would like to live in it just take a little patience to seek out the best deal and some sweat equity. You end up with something much nicer than what you had before and you are able to enjoy it and NOT wait until you are going to sell YOUR HOME to fix YOUR HOME!
DIY takes a lot of searching for the bargains and a little research and talking to the DIY home improvement store experts, they are very helpful and ready to help you get your project done! So get inspired and start a project~! Ana Maria


from playful kid s bathroom to sophisticated adult teen bathroom on a budget not, bathroom ideas, diy, home decor, BEFORE old water guzzling toilet laminate counters vinyl flooring the mirror was the old giant mirror with the 8 giant light bulbs on the top yes you know the one that looks like a giant makeup mirror


from playful kid s bathroom to sophisticated adult teen bathroom on a budget not, bathroom ideas, diy, home decor, Almost done after Still some work to be done but new floor is in New toilet new curtain


from playful kid s bathroom to sophisticated adult teen bathroom on a budget not, bathroom ideas, diy, home decor, AFTER New mirror toilet sink granite knobs paint on the walls curtains


from playful kid s bathroom to sophisticated adult teen bathroom on a budget not, bathroom ideas, diy, home decor, AFTER New mirror toilet sink granite knobs paint on the walls curtains new floor


from playful kid s bathroom to sophisticated adult teen bathroom on a budget not, bathroom ideas, diy, home decor, AFTER New granite faucet soap dispenser and sink


from playful kid s bathroom to sophisticated adult teen bathroom on a budget not, bathroom ideas, diy, home decor, AFTER New mirror and light old mirror was the giant makeup vanity mirror with row of large light bulbs


from playful kid s bathroom to sophisticated adult teen bathroom on a budget not, bathroom ideas, diy, home decor, AFTER New crown molding curtain and paint


from playful kid s bathroom to sophisticated adult teen bathroom on a budget not, bathroom ideas, diy, home decor, AFTER New paint new light before the mirror went up


from playful kid s bathroom to sophisticated adult teen bathroom on a budget not, bathroom ideas, diy, home decor, AFTER New light


from playful kid s bathroom to sophisticated adult teen bathroom on a budget not, bathroom ideas, diy, home decor, BEFORE


from playful kid s bathroom to sophisticated adult teen bathroom on a budget not, bathroom ideas, diy, home decor, AFTER


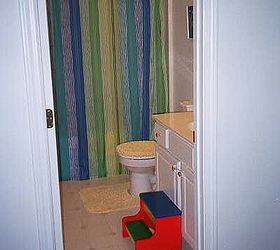
Original article and pictures take http://www.hometalk.com/141064/from-playful-kid-s-bathroom-to-sophisticated-adult-teen-bathroom-on-a-budget-not site


Bedroom Refresh For Teen Girl


Before we get to the good part, let’s see what we started out with shall we? It wasn’t horrible … but it wasn’t good either. She’s a creative child who was constantly crafting at her desk and painting beautiful works of art …


We have had her room arranged so many different ways, even making her closet into a nook for her bed at one time. This didn’t last long for practical reasons.
Her room is long and narrow so it is a bit of a challenge as to how to arrange things creatively. On the up side … it does have a large closet so she really doesn’t need much for furniture.
Both she and I were getting tired of it being mismatched and feeling “not quite right” all the time. The room had been the same soft yellow for the past five years and the walls were needing a freshening.
A room refresh for her was long overdue! It was time for this room to grow up and find the pretty factor …
now …


bedroom refresh for teen girl, bedroom ideas


bedroom refresh for teen girl, bedroom ideas


It got a fresh coat of white paint to lighten and enlarge the space. New ruffled curtains, Freshly painted furniture and new bedding! We recycled an old quilt and covered it with linen to make a new one. Oh yes, don’t forget the lighting!
All the furniture got 2 coats of Fusion’s Inglenook Ocean. I still can’t believe that one 500 ml jar went this far!


bedroom refresh for teen girl, bedroom ideas


bedroom refresh for teen girl, bedroom ideas


This little dresser is still waiting on hardware for the bottom drawer. I decided that the bottom drawer should have pulls and not knobs. It just looked awkward with knobs when I put them on.
The large empty frame is still looking for the perfect inspirational phrase to go in it. She decided that she’d like words instead of a chalkboard or image in it.


bedroom refresh for teen girl, bedroom ideas


I made 5 more pillows with more ruffles in different sizes. The two with the crocheted lace are made out of an old bed skirt that I had. The lace was the bottom trim of it.


bedroom refresh for teen girl, bedroom ideas


For more details on this room refresh please visit the link below. If you like what you see please subscribe to the blog and get new posts sent directly to your inbox! I hope you have a great day!
Smiles!


bedroom refresh for teen girl, bedroom ideas


bedroom refresh for teen girl, bedroom ideas


Original article and pictures take http://www.hometalk.com/14111138/bedroom-refresh-for-teen-girl site